#localhost
tunneling and mysql
22 October 2008
I have a mysql server for reviewsby.us that requires tunneling, and after establishing a tunnel like so:
Read full post
I have a mysql server for reviewsby.us that requires tunneling, and after establishing a tunnel like so:
Read full post
I’ve done some rewrites of code, and they usually are coupled with redesigns.
Read full post
I want to start dabbling with postgreSQL on OS X. After several SVN checkouts, binary packages, etc, I’ve realize the easiest path to success is just installing from fink unstable.
Read full post
I decided to play version control private-eye today when my coworker mentioned that we make a system call to check the time several times per request on a few specific pages.
Read full post
Imagine the most ideal way for something to work, assume that it’s going to work, and then make it work like that.
It’s amazing how much bad coupled code exists for no good reason.
Read full post
Imagine the most ideal way for something to work, assume that it’s going to work, and then make it work like that.
It’s amazing how much bad coupled code exists for no good reason.
Read full post
[tags]django, plugins, apps, projects, symfony[/tags]
Read full post
[tags]yui, autocomplete, javascript, jquery, symfony[/tags]
Read full post
So I started yesterday with Django, and I decided I didn’t want to futz with creating another mysql database that I’d need to manage, etc. Instead I’ll just use sqlite.
I wanted to keep my sqlite database within my project regardless of where I might move my project later. So I did this:
I confused a lot of people on IRC, but it’s really quite easy:
__file__ is the filename of the current script, very similar to PHP’s __FILE__os.path.abspath calculates the absolute path, hence the absolute path of the current fileos.path.join does all the nasty business of joining paths together and figuring out what type of slashes are needed, etc.So really all we were doing is creating a relative path, but setting it absolutely.
Read full post
[tags]django, inheritance[/tags]
Read full post
[tags]php, python, symfony, frameworks, programming[/tags]
Read full post
[tags]php, python, symfony, frameworks, programming[/tags]
Read full post
I decided I want to learn python, if only to learn Django and to “get” what all the python hub-bub is about.
Python’s named arguments in function calls is pure genius. Let me explain.
In PHP, and many other languages you can define a function as such:
function foo($a = 2, $b = 2)
{
	return pow($a,$b);
}
If you follow, foo() will give you 4. foo(3) is 9 and foo(99,0) is 1. In python we can do the same thing, but it’ll pay to use some better variable names:
def foo(base=2, exponent=2):
	return base**exponent
Similarly foo() will give you 4. foo(3) is 9 and foo(99,0) is 1. But what if we forgot what the order was? Did base come first or was it exponent? We can do this:
foo(exponent=99, base=2)
Since base and exponent both have default values, we can even omit base and let it use the default:
foo(exponent=10)
This means rather than passing an $options array to my functions and checking whether an option was set or not, I can just specify which options I want in my function call. Or instead of remembering the order of the arguments, I can use whatever order suits me. Or instead of calling a function like bar(null, null, null, 2) I can just skip those first three arguments all together.
A side effect of this, is now there’s a real use, even for simple functions, to give your variables easy to remember names.
Read full post
After talking to people about the benefits and disadvantages of various ORMs… and reading up a little on non RDMBSs like Amazon SimpleDB I came to the realization that ORM is really a hack to get RDBMSs to work as a storage for objects.
I’m being liberal with the term hack. It really does work for a lot of situations, but it’s not very elegant. The workflow is more or less this:
There’s a lot that goes into database definition. It would be nice to breakout from this line of thinking and do things a bit differently:
Let the database learn from the saving of the object how to define the type. In fact, it should be flexible and let us have mixmatched types, etc.
Let the database index everything, and keep the indexes up to date, but prioritize it based on usage. In other words if we usually query a database of Persons in order by a field called lastname, then make sure that index on lastname is always at hand. We should be able to query this data back out of storage based on how we stored it.
We should also be able to reach other objects in the database in a similar manner.
The key here is letting the database layer do the heavy-thinking about what to do with serialized data, versus having some middle layer take care of it.
…
so I might just be naive about data and databases. But if this idea is worthwhile and some database people can validate me, I’d be willing to work on it.
Read full post
[tags]js, javascript, readability, yui, jquery, shortcuts[/tags]
Read full post
[tags]symfonyCamp, symfony, netherlands, ajax, zend search lucene, zsl, jquery[/tags]
I’ve been asked to speak at SymfonyCamp (symfony['camp']) next month (you should all go if you can) and I thought I’d present as well as I could on Ajax and the Zend Framework Bridge (including Zend Search Lucene).
If you’re attending the camp and/or would like to hear about these topics please let me know any specific questions you might have about “symfony and Ajax” and “symfony and Zend” and I’ll try to address them in my presentations.
If you are unable to go fear not, I’ll try to post my notes on this site.
Read full post
[tags]php, propel, doctrine, validators, symfony, optiopt, startup[/tags]
Read full post
[tags]Zend, Zend Search Lucene, Search, Lucene, php, symfony, zsl[/tags]
Read full post
[tags]Zend, Zend Search Lucene, Search, Lucene, php, symfony, zsl[/tags]
Read full post
[tags]css, jQuery, layout, javascript, equal, columns, equal columns[/tags]
I’ve seen a few examples of how to equalize column heights using javascript, and none of them seem appealing:
So I wrote my own:
$("#col1, #col2").equalizeCols();
will equalize the columns as expected
$("#col1, #col2").equalizeCols("p,p");
will equalize the columns and add the extra space after the p tag in #col1 or #col2 (whichever is shorter).
Here’s our function:
This requires jQuery of course, and it hasn’t been tested much.
Read full post
[tags]symfony, yaml, configuration, web debug, debug[/tags] [symfony]: http://symfony-project.com/
Read full post
[tags]Zend, Zend Search Lucene, Search, Lucene, php, symfony, zsl, index[/tags]
Read full post
[tags]symfony, subversion[/tags]
There’s some tricks you can do to running a symfony project with subversion:
cache/ and log/The first thing you can do (and this is well documented in the askeet tutorial) is ignore files in cache/ and log/. These files are specific to each instance of your app and don’t contain anything that needs to be in version control.
Run the following:
cd $SF_ROOT
rm -rf log/* cache/*
svn propedit svn:ignore log
svn propedit svn:ignore cache
svn propedit will bring up a text editor, in both instances you want to save the following:
*
Eric Sink wrote an excellent tutorial on source control. In his chapter on repositories he recommends checking in only hand edited source code. If a property file generates another file, check in the property file, not the auto-generated result. This not only keeps your repository clean, it prevents a lot of unnecessary check-ins.
If you use propel for your ORM layer there are a few files you can ignore using svn propedit svn:ignore {dirname}.
In $SF_ROOT/config we can ignore:
*schema-transformed.xml
These are xml files that propel generates from schema.xml (or schema.yml).
In $SF_ROOT/data/sql we can ignore:
lib.model.schema.sql
plugins.*.sql
sqldb.map
These are created from schema.xml (or schema.yml) as well.
The real savings will come with your model. The propel model creates customizable php classes in lib/model which inherit from auto-generated files in lib/om there are also auto-generated map files in `lib/map’
We can run from $SF_ROOT:
svn propedit svn:ignore lib/model/om
svn propedit svn:ignore lib/model/map
and enter
*
for both properties.
If you’ve mistakenly checked in some of these files you will need to remove them from your repository via svn delete.
I prefer to embed the symfony library into each of my symfony apps rather than relying on a shared PEAR library. This lets me run multiple versions of symfony without much fuss. With subversion we can use the svn:externals property to directly link our app with the symfony subversion repository.
At first this sounds like danger, but externals can be linked to specific revisions. However, the symfony team tags their repository with version numbers. To get this to work we need to do 3 things. (UPDATE: See Fabien’s comment about using the lib/vendor directory)
config/config.php to look for symfony internally. Just open it up and change it so it says this:
Run svn propedit svn:externals lib from $SF_ROOT and enter:
symfony http://svn.symfony-project.com/tags/RELEASE_1_0_2/lib/ or whatever version of symfony you want to link to, at the time of this post, `RELEASE_1_0_2` is fairly fresh.
Run svn propedit svn:externals data from $SF_ROOT and enter:
symfony http://svn.symfony-project.com/tags/RELEASE_1_0_2/data/ or whatever version of symfony you want to link to, at the time of this post.
Now when you do svn update you’ll have the symfony library all linked up. Furthermore this keeps all the developers on the same version of symfony.
Also you may want to start running symfony using ./symfony versus symfony. The former looks at your configuration settings to determine which symfony command to use, the latter is generally linked to your system wide command (which is generally the PEAR installed command).
I have my hands in a number of symfony plugins because I work on a lot of projects which tend to share a lot of similar functionality. Many of the plugins are in early stages of development, so I find it helpful to have them linked from svn as well. This way I can get the benefits of any new functionality and if the occasion should arise, I can contribute any useful changes I make.
To link to the plugins you run svn propedit svn:externals plugins and enter one plugin per line in the following format:
{plugin_name} -r{REVISION} {URL}
For one of my projects I use:
sfPrototypeTooltipPlugin http://svn.symfony-project.com/plugins/sfPrototypeTooltipPlugin
sfGuardPlugin http://svn.symfony-project.com/plugins/sfGuardPlugin
sfZendPlugin http://svn.symfony-project.com/plugins/sfZendPlugin
I’ve omitted the revision, because I live dangerously and want to use the latest $HEAD.
[tags]Zend, Zend Search Lucene, Search, Lucene, php, symfony, zsl, plugins[/tags]
Read full post
[tags]geocoding, caching, REST, symfony, Cache_Lite, php, cache, sfFunctionCache[/tags]
For reviewsby.us we do a lot of geocoding. To facilitate we use Yahoo! Geocoding API. This helps us normalize data, obtain latitude and longitude, interpret location specific searches.
These REST queries happen a lot and will continue to happen, but this data that Yahoo! provides is fairly static. We’re basically querying a database of sorts. So it makes sense that we should cache this data.
We’ll demonstrate how to cache these queries using symfony’s sfFunctionCache class.
I wrote a wrapper (I’ll release it as a plugin if requested) for the Geocoding API, the bulk of the work (the REST call) occurs in a function called doQueryGIS:
The call to this function is always wrapped with queryGIS:
This wrapper creates a sfFunctionCache objet and calls the function and caches it for subsequent queries.
What this means is once Yahoo! teaches reviewsby.us that India is located at (25.42°, 77.830002°) and that the precision is ‘country’ we remember it in the future.
These features will be incorporated into future versions of reviewsby.us.
Read full post
[tags]best practices, php[/tags]
Read full post
[tags]programmers, hiring[/tags]
Read full post
[tags]best practices,php,openID[/tags] [PHP]: http://php.net/ [openID]: http://openid.net/ [reviewsby.us]: http://reviewsby.us/ [symfony]: http://www.symfony-project.com/
Read full post
By using a simple RSS feed, you can have Adium report your Facebook status.
I am a late-adopter to social networks. I participated in LiveJournal years after many of my friends started using it. I finally got into Facebook months after it was “openned up.” I like this strategy because I can immediately find my friends on the network and add them and amass 100s in a few short days.
Facebook is nice for its simple and clean interface. Even the features are fairly simple. I like the status feature… for no good reason. It’s a simple AJAX status update that updates your status on the site. What I don’t like to do is repeat myself. I wanted Adium to repeat what Facebook said.
My first inkling was to use the Facebook API, but that seemed less appealing since it would involve authentication. I almost gave up and then discovered that in Facebook you can go to “My Profile” and under “Status” go to “See All” and there’s an RSS link to your status messages. Awesome. All I needed to do is grab the first one.
I decided this looked like a task for Simple XML which can take an XML string and turn it into a PHP object.
The first step of course was to fetch the RSS feed into a string. file_get_contents made the most sense, but Facebook does a browser check even for getting RSS feeds. I’m not fond of browser sniffing, but its easy to work around if you use cURL.
Excellent… this does exactly what I want - but it’s slow. Like any good script, we should use caching if it makes sense. Obviously we don’t want to overload the servers at Facebook (or for that matter any place that serves up RSS feeds) so we implement PEAR’s Cache_Lite package. We’ll tell it to cache results for 15 minutes. The code changes are marked with //+++ at the end of each new line:
That’s it on the PHP side. On the Adium side you’ll need to use the exec AdiumXtra. It’ll allow you to set your status to something like:
/exec {/usr/local/php5/bin/php /usr/local/bin/facebook.php}
Enjoy.
Read full post
One of my clients approached me with a relatively easy project. She gave me a log file of PHP errors and I was supposed to fix her scripts. I fixed about 100+ different errors in a few hours. It was fairly straightforward.
Throughout the site I could understand the previous developer and the choices he or she made for better or worse. It did look like a struggle however.
Ultimately it felt that there were some fairly simple things that each script needed to do, but each task was a challenge. Validating forms, storing data across pages, decorating the site, interacting with the database. Everything seemed very kludged together.
I realized that this is exactly how I used to write code, sure… my way of course was better and more logical, yada, yada, yada… but ultimately I was there before.
My client noted that these scripts were made from another contract programmer, and then a light-bulb went on… frameworks (whether it be symfony, ROR, Django, CakePHP, etc) help iron out and standardize these tasks.
Since I know symfony best, I’ll cover what I think could have helped in this last project. I’m sure other major frameworks have their equivalents.
$_SESSION array in PHP. While very useful and easy to use, storing parameters and attributes to a user object is done a lot more cleanly.header() and footer() functions for each and every page.Not only do the bulk of these problems disappear with a framework, a lot of the difficulties of switching developers melt away. If you tell me, a developer, that I’m walking into a project made with a framework, I can learn about the framework and be able to understand its ins and outs.
If you just tell me it’s written in PHP, chances are I’m going to want to do things my own way. It’s hard to understand the logic that another programmer was using so we fall back to standards whether they are your own or borrowed.
When we use a framework, we can find some mutually agreed upon standards and usually people who specialize in that framework and are willing to help. So my advice: stick to frameworks. The coding style will be no worse than the whims of a programmer, but at best it’ll be something that anyone can pick up. The general case is that even a bad coder can only do so much damage within a framework. The bullet points I covered above will cut down on development time tremendously.
Read full post
I like the way that Lightbox Gone Wild will automatically pickup any links with the class=lbOn, but I wanted to use (at some point) Prototype Window Class instead.
Luckily PWC is built on Prototype which means we’ve already loaded a helpful library.
In order to take all class=lbOn objects and run them through PWC we just write a simple loop and iterate.
So here’s the low-down:
In your page add this bit of JavaScript:
So, this code simply looks for all the anchor tags with class=lbOn and then creates a new mylb instance for each anchor. The end.

Note: Like many of my tutorials, you don’t need symfony, just PHP. However, I develop in symfony and take advantage of the MVC-support that it offers.
Years ago when I was working on a photo gallery for davedash.com I got the art of making tumbnails down fairly well. It was automated and didn’t allow for specifying how the thumbnail should be made. With dozens of photos (which was a lot back then), when would I find that kind of time.
Flashback to today, for my company… we want users with avatars… but nothing too large. Maybe a nice 80x80 picture. Well the coolest UI I’ve seen was Apple’s Address Book which let you use this slider mechanism to crop a fixed sized image from a larger image.
Here’s a demo.
The front-end GUI is based on code from digg which is based on the look and feel (as near as I can tell) from Apple.
The GUI provides a clever visual way of telling the server how to chop the image. The gist is this, sliding the image around and zooming in and out change a few form values that get passed to another script which uses this data to produce the image.
In this tutorial, we’re going to be cropping an 80x80 avatar from an uploaded image. The front-end requires the correct mix of Javascript, CSS, HTML and images. The Javascript sets up the initial placements of the image and the controls. The CSS presents some necessary styling. The images makeup some of the controls. The HTML glues everything together.
Let’s work on our HTML first. Since I used symfony, I created a crop action for a userpics module. So in our cropSuccess.php template:
<div id="ava">
	<?php echo form_tag("userpics/crop") ?>
		<div id="ava_img">
			<div id="ava_overlay"></div>
			<div id="ava_drager"></div>
			<img src="<?php echo $image ?>" id="avatar" />
		</div>
		<div id="ava_slider"><div id="ava_handle"></div></div>
		<input type="hidden" id="ava_width" name="width" value="80" />
		<input type="hidden" id="ava_x" name="x" value="100" />
		<input type="hidden" id="ava_y" name="y" value="100" />
		<input type="hidden" id="ava_image" name="file" value="<?php echo $image ?>" />
		</div>
		<input type="submit" name="submit" id="ava_submit" value="Crop" style="width: auto; font-size: 105%; font-weight: bold; margin: 1em 0;" />
	</form>
</div>
Right now a lot of this doesn’t quite make sense. If you attempt to render it, you will just see only the image. As we add the corresponding CSS and images it will make some more sense.
We’ll go through each style individually and explain what purpose it serves in terms of the GUI.
#ava is our container.
#ava {
	border: 1px solid gray;
	 width: 200px;
}
#ava_img is the area that contains our image. Our window for editing this image 200x200 pixels. If we drag out image out of bounds we just want the overflowing image to be clipped. We also want our position to be relative so any child elements can be positioned absolutely with respect to #ava_img.
#ava_img {
	width: 200px;
	height: 200px;
	overflow: hidden;
	position: relative;
}

#ava_overlay is a window we use to see what exactly will be our avatar. If it’s in the small 80x80 window in the center of the image, then it’s part of the avatar. If it’s in the fuzzy region, then it’s getting cropped out. This overlay of course needs to be positioned absolutely.
#ava_overlay {
	width: 200px;
	height: 200px;
	position: absolute;
	top: 0px;
	left: 0px;
	background: url('/images/overlay.png');
	z-index: 50;
}
#ava_drager is probably the least intuitive element (Heck, I’m not even sure if I’ve even got it right). In our demo you’re not actually dragging the image, because you can drag anywhere within the #ava_img container and move the image around. You’re using dragging an invisible handle. It’s a 400x400 pixel square that can be dragged all over the container and thusly move the image as needed.
#ava_drager {
	width: 400px;
	height: 400px;
	position: absolute;
	z-index: 100;
	color: #fff;
	cursor: move;
}
#avatar is our image, and since it will be moving all around the window, it requires absolute positioning.
#avatar {
	position: absolute;
}


#ava_slider and #ava_handle are our slider components. They should be self-explanatory.
#ava_slider {
	width: 200px;
	height: 27px;
	background: #eee;
	position: relative;
	border-top: 1px solid gray;
	background: url('/images/slider_back.png');
}
#ava_handle {
	width: 19px;
	height: 20px;
	background: blue;
	position: absolute;
	background: url('/images/handle.png');
}
PNG do not work so well in Internet Explorer, but there is a small trick, adding these components into a style sheet that only IE can read will make things work:
#ava_overlay {
  background: none;
  filter:progid:DXImageTransform.Microsoft.AlphaImageLoader(src='/images/ui/cropper/overlay.png', sizingMethod='crop');
}

#ava_handle {
  background: none;
  filter:progid:DXImageTransform.Microsoft.AlphaImageLoader(src='/images/ui/cropper/handle.png', sizingMethod='crop');
}
The Javascript is actually not as complicated as you’d expect thanks to the wonder of prototype. This framework provides so much so easily. You’ll need to include prototype.js and dom-drag.js.
So let’s take a look.
<script type="text/javascript" language="javascript" charset="utf-8">
// <![CDATA[
function setupAva() {
	if ($("avatar")) {
		var handle = $("ava_handle");
		var avatar = $("avatar");
		var drager = $("ava_drager");
		var slider = $("ava_slider");
		var ava_width = $("ava_width");
		var ava_x = $("ava_x");
		var ava_y = $("ava_y");
		// four numbers are minx, maxx, miny, maxy
		Drag.init(handle, null, 0, 134, 0, 0);
		Drag.init(drager, avatar, -100, 350, -100, 350);
		var start_w = avatar.width;
		var start_h = avatar.height;
		var ratio = (start_h / start_w);
		var new_h;
		var new_w;
		if (ratio > 1) {
			new_w = 80;
			new_h = (80*start_h)/start_w;
		} else {
			new_h = 80;
			new_w = (80*start_w)/start_h;
		}
		// these need to be set after we init
		avatar.style.top = '100px';
		avatar.style.left = '100px';
		avatar.style.width = new_w + 'px';
		avatar.style.height = new_h + 'px';
		avatar.style.margin = '-' + (new_h / 2) + 'px 0 0 -' + (new_w / 2) + 'px';
		handle.style.margin = '3px 0 0 20px';
		avatar.onDrag = function(x, y) {
			ava_x.value = x;
			ava_y.value = y;
		}
		handle.onDrag = function(x, y) {
			var n_width = (new_w + (x * 2));
			var n_height = (new_h + ((x * 2) * ratio));
			avatar.style.width = n_width + 'px';
			avatar.style.height = n_height+ 'px';
			ava_width.value = n_width;
			avatar.style.margin = '-' + (n_height / 2) + 'px 0 0 -' + (n_width / 2) + 'px';
		}
	}
}
Event.observe(window,'load',setupAva, false);
// ]]>
</script>
If this isn’t exactly crystal clear, I can explain. If you’re new to prototype, $() is the same as doucment.getElementByID() (at least for our purposes).
We need to initialize two draggable elements, one is our slider for zooming and the other is our avatar itself. We initialize the draggers using Drag.init(). We specify what to drag, if another element should be used as a handle and then the range of motion in xy coordinates. In the second call we use that #dragger to move around the image in this manner.
Drag.init(handle, null, 0, 134, 0, 0);
Drag.init(drager, avatar, -100, 350, -100, 350);
We want to initialize the the size and placement of the avatar. We do that using maths. First we want it in our 80x80 pixel box. So it should be roughly 80x80. I’ve set the math up so that the smallest side is 80 pixels (there’s reasons for doing this the other way around).
	if (ratio > 1) {
		new_w = 80;
		new_h = (80*start_h)/start_w;
	} else {
		new_h = 80;
		new_w = (80*start_w)/start_h;
	}
We then place the avatar element. We initialize it to be in the center of the screen (top: 100px;left:100px) and then nudge the image using margins.
	avatar.style.top = '100px';
	avatar.style.left = '100px';
	avatar.style.width = new_w + 'px';
	avatar.style.height = new_h + 'px';
	avatar.style.margin = '-' + (new_h / 2) + 'px 0 0 -' + (new_w / 2) + 'px';
We also use margins to place the handle.
handle.style.margin = '3px 0 0 20px';
#ava_x and #ava_y tell us where the center of the avatar is. So when the avatar is moved we need to set these again:
	avatar.onDrag = function(x, y) {
		ava_x.value = x;
		ava_y.value = y;
	}
That was easy. Slighly more complicated is the zoomer function. We are basically adjusting the width and the height proportionately based on roughly where the slider is. Note that we’re still using that ratio variable that we calculated earlier. We basically take the new x-coordinate of the handle and allow our image to get just slightly larger than the #ava_image container.
	handle.onDrag = function(x, y) {
		var n_width = (new_w + (x * 2));
		var n_height = (new_h + ((x * 2) * ratio));
		avatar.style.width = n_width + 'px';
		avatar.style.height = n_height+ 'px';
		ava_width.value = n_width;
		avatar.style.margin = '-' + (n_height / 2) + 'px 0 0 -' + (n_width / 2) + 'px';
	}
We want to load initialize the slider right away when the page loads: Event.observe(window,'load',setupAva, false);
Not terribly hard or complicated. Once these elements are all in place you have a working functioning slider. It returns the x and y coordinates of the center of the image with respect to our 200x200 pixel #ava_image. It also tells us the new width of our image. We feed this information into a new script and out should pop a new image which matches exactly what we see in our GUI.
Initially I was frustrated with the data that was being sent. I knew the center of the image in relation to this 200x200 pixel canvas and its width… but what could I do with that. Well I could just recreate what I saw in the GUI. I needed to create a 200x200 pixel image first, place my original avatar resized (and resampled) at the precise coordinates and then cut out the center most 80x80 pixels to become the final avatar image.
If you note in our template above for cropSuccess.php we submit our form back to the crop action. Let’s look at the action:
public function executeCrop()
{
	if ($this->getRequestParameter('file')&&$this->getRequestParameter('width')) {			// we are saving our cropped image
		// Load the original avatar into a GD image so we can manipulate it with GD
		$o_filename = $this->getRequestParameter('file');  // we'll use this to find the file on our system
		$o_filename = sfConfig::get('sf_root_dir').'/web' . $o_filename;
		$o_im = @imagecreatetruecolor(80, 80) or die("Cannot Initialize new GD image stream");
		$o_imagetype = exif_imagetype($o_filename); // is this gif/jpeg/png

		// appropriately create the GD image
		switch ($o_imagetype) {
			case 1: // gif
				$o_im = imagecreatefromgif($o_filename);
				break;
			case 2: // jpeg
				$o_im = imagecreatefromjpeg($o_filename);
				break;
			case 3: // png
				$o_im = imagecreatefrompng($o_filename);
				break;
		}

		// Let's create our canvas
		$im = @imagecreatetruecolor(200, 200) or die("Cannot Initialize new GD image stream");
		imagecolortransparent ( $im, 127 ); // set the transparency color to 127
		imagefilledrectangle( $im, 0, 0, 200, 200, 127 ); // fill the canvas with a transparent rectangle

		// let's get the new dimension for our image

		$new_width = $this->getRequestParameter('width');
		$o_width = imageSX($o_im);
		$o_height = imageSY($o_im);

		$new_height = $o_height/$o_width * $new_width;

		// we place the image at the xy coordinate and then shift it so that the image is now centered at the xy coordinate
		$x = $this->getRequestParameter('x') - $new_width/2;
		$y = $this->getRequestParameter('y') - $new_height/2;

		// copy the original image resized and resampled onto the canvas
		imagecopyresampled($im,$o_im,$x,$y,0,0,$new_width,$new_height,$o_width,$o_height);
		imagedestroy($o_im);

		// $final will be our final image, we will chop $im and take out the 80x80 center
		$final = @imagecreatetruecolor(80, 80) or die("Cannot Initialize new GD image stream");
		imagecolortransparent ( $final, 127 ); // maintain transparency

		//copy the center of our original image and store it here
		imagecopyresampled ( $final, $im, 0, 0, 60, 60, 80, 80, 80, 80 );
		imagedestroy($im);

		//save our new user pic
		$p = new Userpic();
		$p->setUser($this->getUser()->getUser());
		$p->setGD2($final);
		$p->save();
		imagedestroy($final);
		$this->userpic = $p;
		return "Finished";
	}


	$this->getResponse()->addJavascript("dom-drag");
	$this->getResponse()->addJavascript('/sf/js/prototype/prototype');
	$this->getResponse()->addJavascript('/sf/js/prototype/effects');
	$this->image = '/images/userpics/originals/' . $this->getRequestParameter('file');
}
It’s doing exactly what the paragraph above explains when the image dimensions are given. The code is well commented so it should be easy enough to follow.
GD image functions in PHP are fairly robust and can help you do a lot of tricks with image data. Note the code to save the image, we’ll cover it in detail soon.
$p = new Userpic();
$p->setUser($this->getUser()->getUser());
$p->setGD2($final);
$p->save();
First some clarification the second line. myUser::getUser() gets the User object associated with the currently logged in user. The third line, however, is where the magic happens. Before we look at it, let’s have a quick look at our model:
userpic:
 _attributes: { phpName: Userpic }
 id:
 user_id:
 image: blob
 thumb: blob
 created_at:
 updated_at:
We have an image attribute and a thumb property to our Userpic object. This is where we store PNG versions of each icon and their 16x16 thumbnails respectively. We do this in Userpic::setGD2():
public function setGD2($gd2_image)
{
	//convert to PNG
	ob_start();
	imagepng($gd2_image);
	$png = ob_get_clean();
	//save 16x16
	$gd2_tn = @imagecreatetruecolor(16, 16) or die("Cannot Initialize new GD image stream");
	imagealphablending( $gd2_tn, true );
	imagecolortransparent ( $gd2_tn, 127 );

	imagecopyresampled ( $gd2_tn, $gd2_image, 0, 0, 0, 0, 16, 16, 80, 80 );
	ob_start();
	imagepng($gd2_tn);
	$tn = ob_get_clean();

	$this->setImage($png);
	$this->setThumb($tn);
}
We capture the output of the full size PNG, then we scale it again and capture the output of the thumbnail and set them.
When it comes to web apps, having a relatively simple GUI for people to resize images can go a long way in terms of adoption rate of avatars and custom user pictures by non technical users.
Enjoy, and if you found this useful (or better implemented it) let me know.
Read full post
[tags]zend, search, lucene, zend search lucene, zsl, symfony,php[/tags]
Read full post
“Digg“-style anything can be pretty slick. The AJAX-interactions on that site make it very fun to use. It’s styles have been copied everywhere, and are definitely worth copying. The latest feature that had caught my eye was the ability to edit your comments for a set time after posting them. Of course, it wasn’t just the ability to edit comments, it was AJAX too and it has a timer.
This is totally something I could use on a restaurant review site. So I started on this project. It’s pretty straight forward. For all of your posted comments you check if the owner of them is viewing them within 3 minutes of posting the commen. 3 minutes is usually enough time to notice you made a typo, but if you disagree I’ll leave it to you to figure out how to adjust the code.
For example, I make a comment, realize I spelled something wrong and then I can click on my comment to edit it. Of course using AJAX means this all happens without having to reload the web page. Therefore the edits are seemingly quick. So let’s add it to any web site.
First and foremost, the ability to edit a comment means you have a form that you can use to edit and submit your changes. But rather than deal with creating a boring unAJAXy form, we’ll enlist the help of script.aculo.us.
First, each comment is rendered using the following HTML and PHP:
<div class="review_block" id="comment_<?php echo $comment->getId() ?>">
	<p class="author"><?php echo link_to_user($comment->getUser()) ?> - <?php echo $comment->getCreatedAt('%d %B %Y') ?></p>
	<div class="review_text" id="review_text_<?php echo $comment->getId()?>"><?php echo $comment->getHtmlNote() ?></div>
</div>
Note that this div and it’s child div have unique ids that we can refer back to (comment_n and review_text_n where n is the id of the comment). We can use this to interact with the DOM via JavaScript. What we do is for each comment, we check if it is owned by the current visitor and if it’s within our prescribed 3 minute window. We can do that with some simple PHP:
<?php if ($comment->getUser() && $comment->getUserId() == $sf_user->getId() && time() < 181 + $comment->getCreatedAt(null) ): ?>
	<script type="text/javascript">
	//<![CDATA[
		makeEditable('<?php echo $comment->getId() ?>', "<?php echo url_for($module . '/save?id=' . $comment->getId()) ?>", "<?php echo url_for('restaurantnote/show?id=' . $comment->getId() . '&mode=raw') ?>", <?php echo 181-(time() - $comment->getCreatedAt(null)) ?>);
	//]]></script>
<?php endif ?>
As you can see we run the makeEditable() function for each applicable comment. As you can guess, makeEditable() makes a comment editable. For parameters it takes the comment’s id (so it can refer to it in the DOM and other background scripts). It also takes as an argument the “save” URL as well as a URL from which it can load the raw comment. The last argument is for the timer.
Here is our function:
var editor;
var pe;
makeEditable = function(id, url, textUrl, time) {
	var div = $("review_text_" + id);

	pe = new PeriodicalExecuter(function() { updateTime(id); }, 1);

	Element.addClassName($('comment_' + id), 'editable');
	new Insertion.Bottom(div, '<div class="edit_control" id="edit_control_'+id+'">Edit Comment (<span id="time_'+id+'">'+time+' seconds</span>)</div>');

	editor = new Ajax.InPlaceEditor(div, url, { externalControl: 'edit_control_'+id, rows:6, okText: 'Save', cancelText: 'Cancel',
	loadTextURL: textUrl, onComplete: function() { makeUneditable(id) } });
}
It does a couple things. It runs a PeriodicalExecuter to run the updateTime function which updates our countdown timer. It adds a CSS class to our comment div. It adds a control button to edit a comment. Lastly it uses the script.aculo.us Ajax.InPlaceEditor to do most of the magic. The hard part is done.
So the updateTime function is reasonably simple. It finds the time written out in the DOM and decrements it by 1 second each second. Once it hits zero seconds it disables itself and the ability to edit the block. Let’s take a look:
updateTime = function(id) {
  var div = $("time_"+id);
  if (div) {
    var time =  parseInt(div.innerHTML) - 1;
    div.innerHTML = time;
  }
  if (time < 1) {
    pe.stop();
    var editLink = $('edit_control_'+id);
    if (Element.visible(editLink)) {
      makeUneditable(id);
      editLink.parentNode.removeChild(editLink);
    }
  }
}
We’ll need a few call backs for the editor to work properly. Since many content pieces are converted from something else to HTML and not directly written in HTML we’ll need a callback that will load our text. We’ll also need a callback which will save our text (and then display it).
The first call back we can see is referenced in the makeEditable() function. In our example it’s:
url_for('restaurantnote/show?id=' . $comment->getId() . '&mode=raw');
Which is a symfony route to the restaurantnote module and the show action with an argument mode=raw. Let’s take a look at this action:
public function executeShow ()
{
	$this->restaurant_note = RestaurantNotePeer::retrieveByPk($this->getRequestParameter('id'));
	$this->forward404Unless($this->restaurant_note instanceof RestaurantNote);
}
All this does is load the text (in our case the [markdown] formatting) into a template.
The save text url in our example is:
url_for('restaurantnote/save?id=' . $comment->getId());
Using the Ajax.InPlaceEditor the value of the text-area is saved to the value POST variable. We consume it in our action like so:
public function executeSave()
{
	$note = RestaurantNotePeer::retrieveByPk($this->getRequestParameter('id'));
	$this->forward404Unless($note instanceof RestaurantNote);
	if ($note->getUserId() == $this->getUser()->getId()) {
		$note->setNote($this->getRequestParameter('value'));
		$note->save();
	}
	$this->note = $note;
}
The note is also sent to a template that renders it, so when the save takes place, the edit form will be replaced with the new text.
As you can see with some script.aculo.us and symfony, it’s fairly easy to mimic “Digg-style” in-place comment editing. You can test out a real example by visiting reviewsby.us.
Read full post
If you’re using symfony’s sync command to synchronize files across environments (e.g. moving your development files to a staging server), it helps usually to clear the cache of the receiving server.
The following line will help:
symfony sync production go ; ssh user@production "cd /var/www; symfony cc"
Assuming you have SSH keys defined and that you change user@production to your username and server host as well as /var/www switched to your website path. Also the symfony command needs to work on your “production” server (or whatever environment).
There may be a cleaner way to take care of this by changing the symfony command, but this works sufficiently well.
One of the more frustrating elements of web development is synchronizing multiple sites: usually a development site, a staging site and a production site. SVN helps with keeping your code versioned, but usually you don’t want to check out a copy of your web site onto your live server.
Usually we use SFTP or rsync. The former has lots of problems, because a lot of manual work is usually involved to make sure you don’t over-write important files.
rsync, however, is a champ and symfony takes advantage of this. The key files you’ll have to deal with are $PROJECT_HOME/config/properties.ini and $PROJECT_HOME/config/rsync_exclude.txt.
Your properties.ini should look roughly like:
[symfony]
  name=reviewsby.us
[staging]
  host=staging.reviewsby.us
  port=22
  user=root
  dir=/var/www/staging/
[staging2]
  host=staging2.reviewsby.us
  port=22
  user=root
  dir=/var/www/staging
Each heading other than “[symfony]” is a different environment. In our example, we have two staging environments. The values under each heading should be self-explanatory. We can now run the following commands:
symfony sync staging
symfony sync staging go
symfony sync staging2
symfony sync staging2 go
The commands that lack go are “dry-runs” which just show you what files will be transfered. The other commands will run rsync and transfer all the files not specified in the exclude file, rsync_exclude.txt.
See askeet or the symfony documentation for more details.
Read full post
Adding a statically-linked syndication feed, a feed that is the same no matter where on the site you are, is a cinch with symfony, but what about dynamically linked syndication feeds? Let’s say we’re building the latest and greatest Web 2.0 app, there’s going to be hundreds of RSS feeds, not just the most recent items. We’ll want the latest comments to a post, the favorite things of a website member and it all has to be feed enabled. Sure, we can slap a link to the RSS feed and call it a day, but let’s go a step further and stick it in the <head/> area as well. That way when someone clicks on the RSS icon in their browser, or adds a web page to Bloglines those extra feeds can be found.
A typical layout.php for a symfony app will have a <head/> section like this:
<head>
	<?php echo include_http_metas() ?>
	<?php echo include_metas() ?>
	<?php echo include_title() ?>
	<?php echo auto_discovery_link_tag('rss', 'feed/latest')?>
	<?php echo auto_discovery_link_tag('rss', '@feed_latest_georss',
	array('title' => 'Latest Restaurants\' Locations (GeoRSS)' ))?>
	<?php echo include_feeds() ?><!-- this is the custom feed includer -->
	<link rel="shortcut icon" href="/favicon.ico" />
</head>
Since this is in the reviewsby.us layout.php, the latest feed and the latest GeoRSS feed (which we developed in this article) will show up on every page. So for example, if you use FireFox, you can subscribe to either link when you click on the orange feed icon (![]() ) in the URL bar no matter where you are in the web-application.
) in the URL bar no matter where you are in the web-application.
To expand this to allow for multiple feeds, we need to include <?php echo include_feeds() ?> (before or after the auto_discovery_link_tag calls makes the most sense).
Let’s created a FeedHelper.php to put the include_feeds() function (don’t forget to add use_helper('Feed') to your layout.php).
The function looks like this:
function include_feeds()
{
	$type = 'rss';
	$already_seen = array();
	foreach (sfContext::getInstance()->getRequest()->getAttributeHolder()->getAll('helper/asset/auto/feed') as $files)
	{
		if (!is_array($files))
		{
			$files = array($files);
		}
		foreach ($files as $file)
		{
			if (isset($already_seen[$file])) continue;
			$already_seen[$file] = 1;
			echo tag('link', array('rel' => 'alternate', 'type' => 'application/'.$type.'+xml', 'title' => ucfirst($type), 'href' => url_for($file, true)));
		}
	}
}
The function is doing what the deprecated include_javascripts and include_stylesheets functions did, just with syndication feeds. Also note, I stuck to just using RSS feeds. This function can no doubt be extended to Atom or other feed types, but for my purposes it was unnecessary1.
In the reviewsby.us site, the menu items are tagged. There’s tags for chicken, indian and bread for example. Each of them are to have an associated GeoRSS feed as described in a previous tutorial. I built our tagging system similar to Askeet. So in our tag module I created a function in the corresponding actions.class.php:
public function addFeed($feed)
{
	$this->getRequest()->setAttribute($feed, $feed, 'helper/asset/auto/feed');
}
This sets the attribute that include_feeds() pulls from. Here $feed is simply the route to our feed. So in our executeShow() I just make a call to $this->addFeed('@feed_tag_georss?tag=' . $tag). We’re done.
We can now go to any of our tagged pages. Let’s try chicken and see that we can subscribe to a GeoRSS feed of restaurants serving dishes tagged as chicken.
Slight problem. The title attribute of the generated link tags are always Rss. That can be mildly unusable.
Let’s change our addFeed() to allow for a second parameter, a title and have it store both the route and the title in the request attribute:
public function addFeed($feed, $title = null)
{
	$feedArray = array('url' => $feed, 'title' => $title);
	$this->getRequest()->setAttribute($feed, $feedArray, 'helper/asset/auto/feed');
}
We’ll also need to adapt the include_feeds to appropriately accommodate associative arrays:
function include_feeds()
{
	$type = 'rss';
	$already_seen = array();
	foreach (sfContext::getInstance()->getRequest()->getAttributeHolder()->getAll('helper/asset/auto/feed') as $feeds)
	{
		if (!is_array($feeds) || is_associative($feeds))
		{
			$feeds = array($feeds);
		}

		foreach ($feeds as $feed)
		{
			if (is_array($feed)) {
				$file = $feed['url'];
				$title = empty($feed['title']) ? $type : $feed['title'];
			} else {
				$file = $feed;
				$title = $type;
			}

			if (isset($already_seen[$file])) continue;

			$already_seen[$file] = 1;
			echo tag('link', array('rel' => 'alternate', 'type' => 'application/'.$type.'+xml', 'title' => $title, 'href' => url_for($file, true)));
		}
	}
}
Note, there’s a function is_associative(). It’s a custom function that we can place in another helper:
function is_associative($array)
{
  if (!is_array($array) || empty($array)) return false;
  $keys = array_keys($array);
  return array_keys($keys) !== $keys;
}
It’s a clever way of determining if a function is an associative array or not.
It looks like our GeoRSS feeds are on all our tag pages. Now we can take our favorite items labeled as Indian food and easily add the URL to a service like Bloglines and have it keep us up to date on new Indian dishes. This was simple, especially when much of the work was taken care of by the framework.
A lot of bugs have popped up recently.
The logins weren’t redirecting people to the correct place. Unfortunately the login system still needs a lot of work. I am probably going to rewrite it completely. It doesn’t consistantly remember where you are coming from or where you intend to go after logging in. I’ll be jotting down a clean system to log people in propperly.
Tags work a bit better. They follow the flickr style of tagging, which is each word is a tag, unless surrounded in double quotes. Previously they weren’t producing a lot of empty tags.
A small error in the database definitions resulted in lat/longitudes of restaurants that were greater than 100 (or rather abs(x) > 100 where x is latitude or longitude were being truncated to 100 or -100. This was easily fixed so things should look just right on the maps.
UPDATE:Cmd-T allows you to search for the files in your currently opened TextMate project. I learned this shortly after writing this post, but forgot to mention it. Thanks again to Tyson Tune for pointing that out.

There’s a number of tools for the OS X that help me with my productivity (and unfortunately have no equivalents on other platforms). Quicksilver, a launcher, and TextMate, a text editor work wonders and together work fairly well.
Quicksilver is a the GUI equivalent to the command line. You can launch applications or files or perform any number of operations on those files or applications. With its powerful collection of plugins you can have it do much more, for example you can take a music file and play it in iTunes within the iTunes party shuffle. Or take an image file and have it submit to flickr with a few simple keystrokes. Initially, I couldn’t get an idea of the application, other than a lot of people loved it. Now, I’m barely using it to its potential and I love it. Using a computer without it is quite a drag.
TextMate is similarly feature rich and elegant. Just using a small number of its features makes it worth its cost. All my symfony projects are written using TextMate as are my articles for this web site. It’s strength for me is its automation. Together Quicksilver and Textmate make a winning combination.

I like the concept of “projects” in TextMate (its common to a lot of text editors). You can drag files or folders into TextMate and group them as you see fit.
Many of my projects are written using symfony, so I’ll try to keep the entire project folder in my TextMate project. Additionally I’ll keep the symfony libraries if not the entire PHP libraries referenced in the project as well. Now I have access to all of my files with relative ease. I generally create a file group in TextMate of frequently accessed files to bypass the pain going through hierarchies of folders.
If I have a TextMate project open, anytime I open a file that belongs in that project, it will open in that project window. That means if I use the mate command line utility, Finder or even Quicksilver, it’ll still open in the project window. This is useful.1
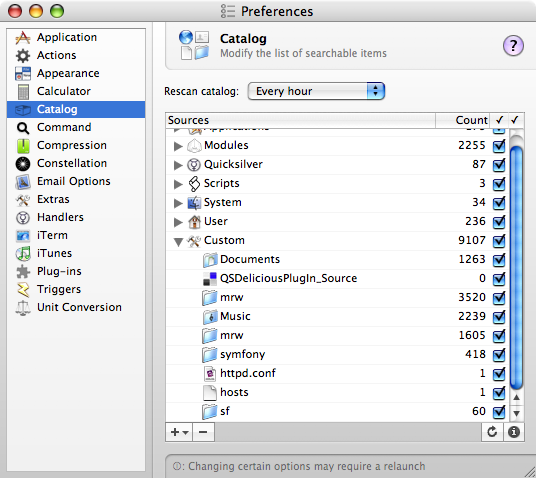
When you open up Quicksilver and type in some letters, it searches some catalogues by default (e.g. Applications, Documents, Desktop, etc) in an attempt to figure out what the “subject” of your action to be. These catalogues are fully customizable, so it’s trivial to add the directories of your project and your libraries into Quicksilver.

Now that you’ve setup your project in TextMate and added the same directories to Quicksilver, you’ll have a much improved workflow. If you save your TextMate project in your Documents directory, you need only open Quicksilver (I use Command+Space as a shortcut) and type a few letters of the project (for example, I named my project file reviewsby.us for my restaurant review site).
When that’s open, I can now open any file of that project in anyway I feel necessary. Let’s say I need to open a library file, like sfFeed.class.php. I need only type in a few letters and it opens inside my project.
This process now saves me a ton of time in digging through hierarchies of folders upon folders. It’s many times quicker than Spotlight. Give it a try, there’s thousands of uses for it, this is just one way I use it.
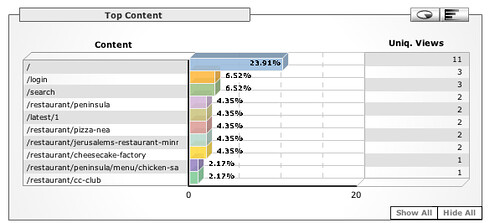
I’ve also jumped on the Google Analytics bandwagon and added a lot of the sites in “family.” If you’re familiar with Urchin, it has a similar feel to it. It almost feels a bit lighter feature-wise. There’s a few issues I will take with it:
Other than that, I like the potential that this will offer me. This combined with Google Sitemaps will provide powerful analysis of the site. As it stands, Katie and I should be eating at the Cheesecake Factory and non-chain restaurants as we seem to do well in the ranks and I need to write more about maps.
Read full post
Francois from the symfony project beat me to the punch. I was going to post a detailed how-to on adding a star-rater to your web site (similar to the one’s I created for reviewsby.us), but for most of you this should do the trick. Unless people request it sooner, I’ll hold off on publishing the details on my star-rater for a while. It only offers a few minor differences (IMO advantages) to this snippet.
Read full post
I helped Katie setup her new blog this weekend and decided that WordPress offers much of what I want out of this blog for a lot less effort than drupal1. I decided it might be worth my time to now while this blog is in it’s infancy to try converting from drupal to WordPress.
The way I start most of my projects is with a plan:
<!--break--> to <!--more-->)I’m really confident that this will be easy. I don’t even have to worry about comments or anything, since this blog is pretty new, but I can demonstrate how to take care of the.
This post details a migration path from drupal to wordpress. Some considerations had to be made since I’m using drupal 4.7.
I followed most of the instructions, with some alterations from vrypan.net.
I installed WordPress and in mysql ran the following commands:
use wordpress;
delete from wp_categories;
delete from wp_posts;
delete from wp_post2cat;
delete from wp_comments
I run my drupal site in the same database server, so the data copying was a snap. If you aren’t so fortunate, just copy the relevant drupal tables temporarily your wordpress database.
First we get the drupal categories into WordPress:
USE wordpress;

INSERT INTO
	wp_categories (cat_ID, cat_name, category_nicename, category_description, category_parent)
SELECT term_data.tid, name, name, description, parent
FROM drupal.term_data, drupal.term_hierarchy
WHERE term_data.tid=term_hierarchy.tid;
Again with the posts:
INSERT INTO
	wp_posts (id, post_date, post_content, post_title,
	post_excerpt, post_name, post_modified)
SELECT DISTINCT
	n.nid, FROM_UNIXTIME(created), body, n.title,
	teaser,
	REPLACE(REPLACE(REPLACE(REPLACE(LOWER(n.title),' ', '_'),'.', '_'),',', '_'),'+', '_'),
	FROM_UNIXTIME(changed)
FROM drupal.node n, drupal.node_revisions r
WHERE n.vid = r.vid
	AND type='story' OR type='page' ;
And the relation between posts and categories:
INSERT INTO wp_post2cat (post_id,category_id) SELECT nid,tid FROM drupal.term_node ;
And finally comments:
INSERT INTO
	wp_comments
	(comment_post_ID, comment_date, comment_content, comment_parent)
SELECT
	nid, FROM_UNIXTIME(timestamp),
	concat('',subject, '<br />', comment), thread
FROM drupal.comments ;
I ended up moving the one static page I had into WordPress’s “pages” section manually.
Since my pages are written in Markdown, I enabled the Markdown for WordPress plugin.
Now for the real test. I needed to go through each page on my site and see if I could get to it using the same URLs. Since I had only 14 posts, I did this somewhat manually. I used drupal’s built in admin to do this from most popular to least popular. Most URLs worked fine. There were a small number that didn’t for various reasons, I used custom mod_rewrite rules to handle them.
My drupal template was fairly clean and simple. So I adjusted the CSS for the default theme in WordPress until I got what I liked. Very minimal changes had to be made to the actual “HTML.”
Well, time to make the switch. In the WordPress administration, I just had to tell it that it’s now going to be located at spindrop.us. Then I moved my WordPress installation to the spindrop.us web root. It was a snap. Let me know if you have any troubles.
[rbu]: http://reviewsby.us/ [ymap]: http://developer.yahoo.com/maps/index.html [gmap]: http://www.google.com/apis/maps/ [ygeo]: http://developer.yahoo.com/maps/rest/V1/geocode.html [GeoRSS]: http://developer.yahoo.com/maps/georss/index.html [symfony]: http://www.symfony-project.com/ [GeoRSS][GeoRSS] is an extension of RSS that incorporates geographic data (i.e. latitude/longitude coordinates). This is useful for plotting any data that might need to be placed on a map. While building out the [reviewsby.us][rbu] map, I decided to use the [Yahoo! Maps API][ymap] versus the [Google Maps API][gmap] because I wanted to gain some familiarity with another API. It was worth trying [Yahoo!'s API][ymap]. First of all, [reviewsby.us][rbu] has addresses for restaurants and Yahoo! provides a simple [Geocoding REST][ygeo] service. This made it easy for me to convert street addresses to latitude and longitude pairs (even though this wasn't required as we'll soon see).[1] The real selling point of [Yahoo!][ymap] was the [GeoRSS] functionality. I can extend an RSS feed (which [symfony] generates quite easily) to add latitude or longitude points (or even the street address), direct my [Yahoo! map][ymap] to the feed and voila, all the locations in that feed are now on the map, and when I click on them, the RSS item is displayed. That cut down on a lot of development time.
Read full post